Sensitive microphone for computer
The simplest computer microphone is a Chinese capsule connected to the input. This capsule microphone is also powered by the computer input. It consists of a condenser microphone with a field-effect transistor amplifier.
Sometimes the sensitivity of such a capsule is not enough; you have to bring it close to your face so that the sound level is normal.
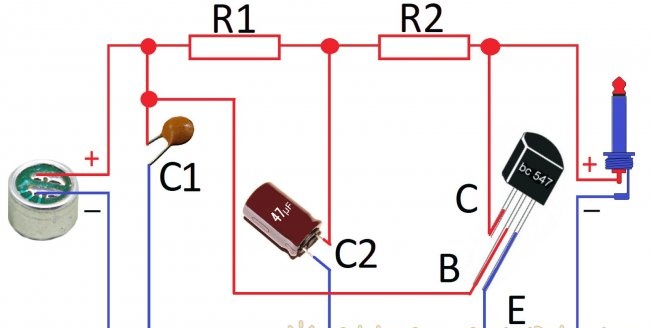
I want to share with you a very simple pre-amplifier circuit for a capsule microphone using a single transistor. This circuit can be used to modify an existing computer headset, or to make an additional microphone in the housing, say, from a syringe. Or just blow it with heat shrink.
There should be no problem finding capsules: they are used almost everywhere in telephones, headsets, Chinese cassette recorders, etc.
The circuit is powered from the computer input and you do not need an additional power source.
1. Transistor BC547 or KT3102, you can try KT315.
2. Resistors R1 and R2 with a nominal value of 1 kOhm.To increase the sensitivity of R1 for the capsule, rated from 0.5 - 10 kOhm.
4. Disc ceramic capacitor with a nominal value of 100-300 pF. It can be omitted if initially there are no “spikes” or excitations of the amplifier.
5. Electrolytic capacitor 5-100 µF (6.3 -16 V).
First of all, let's determine the polarity of connecting the microphone capsule. This is done simply: the minus is always connected to the body. Then we assemble the circuit, either by surface mounting or on a mini-board. The entire sensitivity of the preamplifier will depend on the gain of the transistor and the selected resistor R1. Usually the amplifier is assembled and works immediately; its sensitivity should be sufficient with a reserve.
The recording was made using a capsule without a preamplifier circuit.
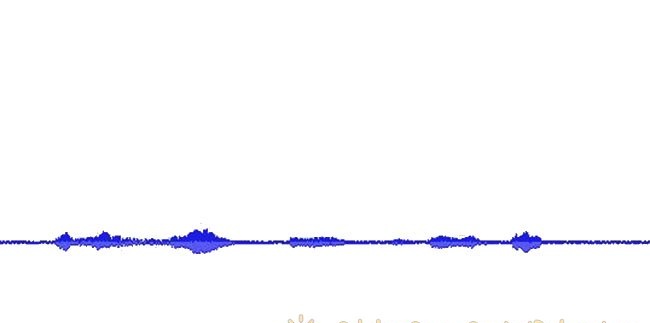
The recording was made on a capsule from a pre-amplifier circuit.

The difference is visible to the naked eye. Now you don’t have to hang a microphone around your neck and shout into it. You can easily put it on the table and speak without any extra effort. Well, if the sensitivity turns out to be too high, then you can always reduce it without any problems using the settings in the operating system.
Sometimes the sensitivity of such a capsule is not enough; you have to bring it close to your face so that the sound level is normal.
I want to share with you a very simple pre-amplifier circuit for a capsule microphone using a single transistor. This circuit can be used to modify an existing computer headset, or to make an additional microphone in the housing, say, from a syringe. Or just blow it with heat shrink.
There should be no problem finding capsules: they are used almost everywhere in telephones, headsets, Chinese cassette recorders, etc.
The circuit is powered from the computer input and you do not need an additional power source.
To assemble the sensitive microphone circuit we will need:
1. Transistor BC547 or KT3102, you can try KT315.
2. Resistors R1 and R2 with a nominal value of 1 kOhm.To increase the sensitivity of R1 for the capsule, rated from 0.5 - 10 kOhm.
4. Disc ceramic capacitor with a nominal value of 100-300 pF. It can be omitted if initially there are no “spikes” or excitations of the amplifier.
5. Electrolytic capacitor 5-100 µF (6.3 -16 V).
First of all, let's determine the polarity of connecting the microphone capsule. This is done simply: the minus is always connected to the body. Then we assemble the circuit, either by surface mounting or on a mini-board. The entire sensitivity of the preamplifier will depend on the gain of the transistor and the selected resistor R1. Usually the amplifier is assembled and works immediately; its sensitivity should be sufficient with a reserve.
The recording was made using a capsule without a preamplifier circuit.

The recording was made on a capsule from a pre-amplifier circuit.

The difference is visible to the naked eye. Now you don’t have to hang a microphone around your neck and shout into it. You can easily put it on the table and speak without any extra effort. Well, if the sensitivity turns out to be too high, then you can always reduce it without any problems using the settings in the operating system.
Similar master classes
Particularly interesting
Comments (6)

