Puppy
The puppy figurine is made from two separate parts. This will not be a flat toy, but a toy that can stand on the table itself without outside help.
First the head detail is done. Fold the square in half, place it in front of you on the table with the wide side - the fold - up. First let's give the head a more rounded shape. To do this, at the bottom corner, bend one layer of paper forward - make a small bend outward. Fold the second layer of paper in the same direction, but tuck it inside, between the layers. Thus, two new angles were formed on the lower part of the dog’s muzzle. Then you need to bend two side corners to the center - blanks for the ears. Each fold should start at the bottom new corner and go through the middle of the side piece, dividing the top edge of each side in half. Then each of these bent ear parts must be bent back, unfolded and flattened. In this case, the top of each ear will bend forward onto the muzzle, giving it a funny look. All that remains is to draw the necessary details on it with a felt-tip pen.
To make the puppy's body, fold the square vertically diagonally and unfold it, only marking the fold line. Now we need to lay the sides towards the center.Only, unlike making the body of other figures, you need to start the bends not from the top corner, but slightly stepping back from each of them along the side - 3-4 cm. Bend the triangle formed at the bottom back. To give the paper toy stability, bend the two lower corners of the workpiece towards you. Then these bends must be straightened and the corners must be bent into the body along the resulting lines. The upper corner of the workpiece must also be bent back.
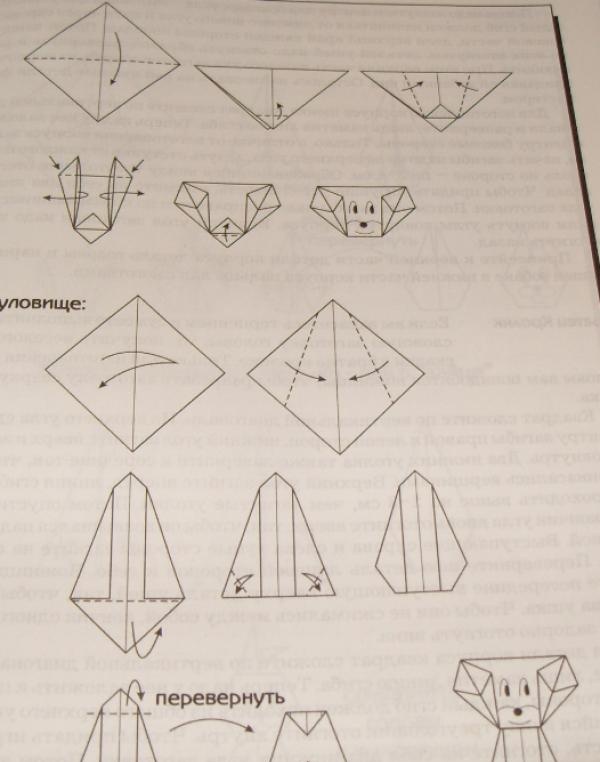
Glue the head part to the upper part of the body part and draw toes and claws for your dog in the lower part of the body.
First the head detail is done. Fold the square in half, place it in front of you on the table with the wide side - the fold - up. First let's give the head a more rounded shape. To do this, at the bottom corner, bend one layer of paper forward - make a small bend outward. Fold the second layer of paper in the same direction, but tuck it inside, between the layers. Thus, two new angles were formed on the lower part of the dog’s muzzle. Then you need to bend two side corners to the center - blanks for the ears. Each fold should start at the bottom new corner and go through the middle of the side piece, dividing the top edge of each side in half. Then each of these bent ear parts must be bent back, unfolded and flattened. In this case, the top of each ear will bend forward onto the muzzle, giving it a funny look. All that remains is to draw the necessary details on it with a felt-tip pen.
To make the puppy's body, fold the square vertically diagonally and unfold it, only marking the fold line. Now we need to lay the sides towards the center.Only, unlike making the body of other figures, you need to start the bends not from the top corner, but slightly stepping back from each of them along the side - 3-4 cm. Bend the triangle formed at the bottom back. To give the paper toy stability, bend the two lower corners of the workpiece towards you. Then these bends must be straightened and the corners must be bent into the body along the resulting lines. The upper corner of the workpiece must also be bent back.

Glue the head part to the upper part of the body part and draw toes and claws for your dog in the lower part of the body.
Similar master classes
Particularly interesting
Comments (0)


