How to make a long-range WiFi antenna from can lids
If your WiFi router has a short range, then in order to use the wireless Internet you have to get closer to it every time. The whole problem is the limited capabilities of its antennas. It is enough to modify one of them, and the range of the wireless network will expand significantly.
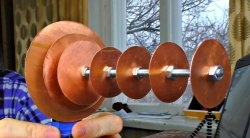
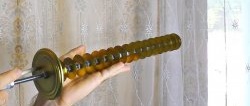
It is necessary to drill 6 seaming caps in the center with a 6 mm drill. One of them is left without modification, the rest are cut off to obtain disks of a smaller diameter. You will need 1 - 70 mm, 1 - 50 mm, and 3 of 40 mm.
On the uncut lid you need to mark a circle with a diameter of 40 mm with a compass. Then, 25 mm from the center, a hole is drilled in it so that its edge touches the beginning of the circle.
You need to center the whole lid and the 70 mm disk, and transfer the location of the side hole to it. Then you need to drill it according to the mark, but with a 1-2 mm drill. This hole needs to be tinned with solder.
Take a hairpin and cut it.
The mounting angle is clamped onto the edge of the stud with nuts. Then, as the radius decreases, the prepared disks are installed using two nuts.
The distance between small ones should be 23 mm, between disks with a diameter of 50 and 70 mm there is a gap of 11 mm, and between the largest ones 9 mm.
One of the standard antennas of the router should be unscrewed and disassembled.
We are interested in the wire inside and the lower part of the antenna housing with threads. A stripped coaxial cable with a wrapped braid is inserted into it. Its central core is wrapped in the housing and connected to the standard wire and braid by soldering. Then everything is wrapped with electrical tape.
An F-connector is placed on the other end of the coaxial cable with the nut removed. It fits tightly into the hole in the first antenna disk. Then the central core of the wire is soldered to the second disk.
Simple design, it’s really easier to make than to buy, see for yourself -
Materials:
- seaming caps - 6 pcs.;
- hairpin M6 – 150 m;
- M6 nuts – 14 pcs.;
- mounting bracket;
- coaxial cable;
- F-connector for TV cable.
The process of manufacturing and connecting the antenna
It is necessary to drill 6 seaming caps in the center with a 6 mm drill. One of them is left without modification, the rest are cut off to obtain disks of a smaller diameter. You will need 1 - 70 mm, 1 - 50 mm, and 3 of 40 mm.
On the uncut lid you need to mark a circle with a diameter of 40 mm with a compass. Then, 25 mm from the center, a hole is drilled in it so that its edge touches the beginning of the circle.
You need to center the whole lid and the 70 mm disk, and transfer the location of the side hole to it. Then you need to drill it according to the mark, but with a 1-2 mm drill. This hole needs to be tinned with solder.
Take a hairpin and cut it.
The mounting angle is clamped onto the edge of the stud with nuts. Then, as the radius decreases, the prepared disks are installed using two nuts.
The distance between small ones should be 23 mm, between disks with a diameter of 50 and 70 mm there is a gap of 11 mm, and between the largest ones 9 mm.
One of the standard antennas of the router should be unscrewed and disassembled.
We are interested in the wire inside and the lower part of the antenna housing with threads. A stripped coaxial cable with a wrapped braid is inserted into it. Its central core is wrapped in the housing and connected to the standard wire and braid by soldering. Then everything is wrapped with electrical tape.
An F-connector is placed on the other end of the coaxial cable with the nut removed. It fits tightly into the hole in the first antenna disk. Then the central core of the wire is soldered to the second disk.
Simple design, it’s really easier to make than to buy, see for yourself -
Watch the video
Similar master classes
Powerful homemade Wi-Fi antenna for receiving remote signals

How to increase the range of your laptop's Wi-Fi
How to improve your WiFi router antenna

3G 4G antenna with a range of more than 30 km

Three ideas for crafts made from plastic bottle caps
How to Improve Wi-Fi in 5 Minutes Using an Aluminum Can
Particularly interesting
Comments (0)


