Kar-Karych from Smeshariki
Hello, dear site visitors. Currently, the characters of the very famous Russian animated series “Smeshariki” are very popular, and each of them is very attractive in their own way. We often come across toys in the form of characters from this cartoon in stores where we sometimes go with our children. And the children, seeing such beauty, begin to ask us to buy them. But what if you don’t have enough money to buy? You can save money, or you can sew a very similar copy yourself if you find the right materials and tools.
It seems to me that Kar Karych turned out very well. To make it, I needed to take: office paper in A4 format, scissors, threads in blue, pink, yellow and black, viscose fabric in blue, pink and yellow; black varnish, one large bead, thin golden braid, reliable glue (for example, “Moment”), black fabric and thread, as well as a needle, filler (cotton wool), safety pins.
Step 1.When starting a craft, I cut out a circle shape from paper, which needs to be bent twice so that the center of the figure is designated. After that, I measure and mark the length and width with a pencil:

Step 2. Now I fold the sides of the circle in half, that is, with the tips towards the middle, to make a paper sample, according to the shape of which four pieces of fabric should be cut out for sewing the body:

Next, I fold the circle shape twice again and cut off the top side corners, after which I get this pattern:

Step 3. Now we need to cut out paper samples for sewing the wings and tail of the toy, in accordance with the dimensions of the body sample. Then it will be possible to take the fabric and cut out parts from it according to the shapes of these samples, but with an indent of approximately 1.5 cm for stitching.
Parts for sewing the body and wings need to be cut out 4 pieces each.
You need to cut out only 2 parts for sewing the tail:

Step 4. Next, along the contours of the paper samples, I sew together the parts of the wings and tail, after which I sew the four parts of the body so that they form a circle shape.
For sewing, you can use a special machine, or if you wish, you can sew the toy by hand, putting your soul into it:

Step 5. We turn the sewn parts inside out and fill them with cotton wool. If the shape of the body is uneven, it can be processed to correct the unevenness.
After filling the parts with cotton wool, I start making the eyes: it seems to me that for the base of the eyes (white “sclera”) of our toy you can take a white plastic sheet or cardboard, and for making the eyelids you can take pink fabric. The pupils can be cut out of a plastic sheet coated with black varnish.Pink eyelids and black pupils need to be glued to the white eye shapes (sclera), after which the finished eyes will be attached to the craft using good glue (for example, special glue brand 88-NT):

Step 6. We “separate” the cotton-filled parts of the wings and tail at the bottom side with stitches to make them “feathers”:

Step 7. Having made the details of the body, eyes, tail and wings, I begin sewing the beak.
Here it will not be possible to simply sew a beak to the body; it will not be very convenient. To make the beak, it would be best to cut three pieces to make the front and back sides.
The front side should be divided into upper and lower parts, which will then need to be sewn together:

Step 8. We sew together the beak parts, after which you will need to make paper samples of the toy’s paws and, according to their shape, cut out four paw parts in pairs from pink fabric, and then sew seams on them:

Step 9. Next, the sewn beak and paws need to be turned to the “front” side:

Step 10. We fill these parts with cotton wool and sew up the holes in them left after inserting the filler. If desired, using yellow or orange threads, you can additionally make seams on the front side of the beak, that is, in the “gap” connecting its upper and lower parts.

Step 11. After making the paws and beak, I start sewing a bow (our character in the cartoon always wears a black bowtie): having made a sample from paper, I cut out two parts from black fabric according to its shape, which will need to be sewn and, if desired, filled with cotton wool for adding volume. The resulting bow will need to be tightened in the middle with a small piece of fabric to add elegance:

Step 12We sew the bow and fill it with cotton wool to add volume, after which we take a small rectangular piece of fabric and sew its horizontal edges. With this piece, after sewing it together, you will need to compress the butterfly in the middle:

We sew the resulting butterfly to the toy.
Now we take a large bead with a gilded thin braid, with which our craft can be hung somewhere as a decoration (for example, on a tree on New Year's Day).
First, I thread the ends of the gilded braid into the hole of the bead, and then sew it to the craft:

To prevent the bead from dangling or falling out, it needs to be glued to the craft:

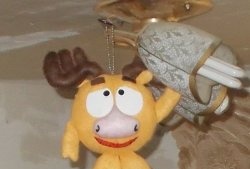
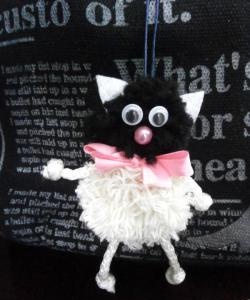
Now our toy is ready, and it is made very similar to its real character from the cartoon series. This is what it looks like from the side:

Back view:

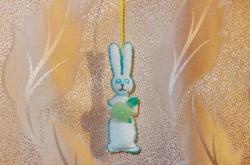
It is a good choice for home decoration and will delight children:

Now that’s it: our handmade toy is ready, and it will certainly bring joy to its owner:

It seems to me that Kar Karych turned out very well. To make it, I needed to take: office paper in A4 format, scissors, threads in blue, pink, yellow and black, viscose fabric in blue, pink and yellow; black varnish, one large bead, thin golden braid, reliable glue (for example, “Moment”), black fabric and thread, as well as a needle, filler (cotton wool), safety pins.
Step 1.When starting a craft, I cut out a circle shape from paper, which needs to be bent twice so that the center of the figure is designated. After that, I measure and mark the length and width with a pencil:

Step 2. Now I fold the sides of the circle in half, that is, with the tips towards the middle, to make a paper sample, according to the shape of which four pieces of fabric should be cut out for sewing the body:

Next, I fold the circle shape twice again and cut off the top side corners, after which I get this pattern:

Step 3. Now we need to cut out paper samples for sewing the wings and tail of the toy, in accordance with the dimensions of the body sample. Then it will be possible to take the fabric and cut out parts from it according to the shapes of these samples, but with an indent of approximately 1.5 cm for stitching.
Parts for sewing the body and wings need to be cut out 4 pieces each.
You need to cut out only 2 parts for sewing the tail:

Step 4. Next, along the contours of the paper samples, I sew together the parts of the wings and tail, after which I sew the four parts of the body so that they form a circle shape.
For sewing, you can use a special machine, or if you wish, you can sew the toy by hand, putting your soul into it:

Step 5. We turn the sewn parts inside out and fill them with cotton wool. If the shape of the body is uneven, it can be processed to correct the unevenness.
After filling the parts with cotton wool, I start making the eyes: it seems to me that for the base of the eyes (white “sclera”) of our toy you can take a white plastic sheet or cardboard, and for making the eyelids you can take pink fabric. The pupils can be cut out of a plastic sheet coated with black varnish.Pink eyelids and black pupils need to be glued to the white eye shapes (sclera), after which the finished eyes will be attached to the craft using good glue (for example, special glue brand 88-NT):

Step 6. We “separate” the cotton-filled parts of the wings and tail at the bottom side with stitches to make them “feathers”:

Step 7. Having made the details of the body, eyes, tail and wings, I begin sewing the beak.
Here it will not be possible to simply sew a beak to the body; it will not be very convenient. To make the beak, it would be best to cut three pieces to make the front and back sides.
The front side should be divided into upper and lower parts, which will then need to be sewn together:

Step 8. We sew together the beak parts, after which you will need to make paper samples of the toy’s paws and, according to their shape, cut out four paw parts in pairs from pink fabric, and then sew seams on them:

Step 9. Next, the sewn beak and paws need to be turned to the “front” side:

Step 10. We fill these parts with cotton wool and sew up the holes in them left after inserting the filler. If desired, using yellow or orange threads, you can additionally make seams on the front side of the beak, that is, in the “gap” connecting its upper and lower parts.

Step 11. After making the paws and beak, I start sewing a bow (our character in the cartoon always wears a black bowtie): having made a sample from paper, I cut out two parts from black fabric according to its shape, which will need to be sewn and, if desired, filled with cotton wool for adding volume. The resulting bow will need to be tightened in the middle with a small piece of fabric to add elegance:

Step 12We sew the bow and fill it with cotton wool to add volume, after which we take a small rectangular piece of fabric and sew its horizontal edges. With this piece, after sewing it together, you will need to compress the butterfly in the middle:

We sew the resulting butterfly to the toy.
Now we take a large bead with a gilded thin braid, with which our craft can be hung somewhere as a decoration (for example, on a tree on New Year's Day).
First, I thread the ends of the gilded braid into the hole of the bead, and then sew it to the craft:

To prevent the bead from dangling or falling out, it needs to be glued to the craft:

Now our toy is ready, and it is made very similar to its real character from the cartoon series. This is what it looks like from the side:

Back view:

It is a good choice for home decoration and will delight children:

Now that’s it: our handmade toy is ready, and it will certainly bring joy to its owner:

(With respect, Vorobyova Dinara)
Similar master classes


Particularly interesting
Comments (0)
