Handmade lilac wedding envelopes
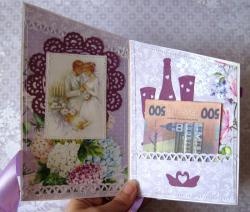
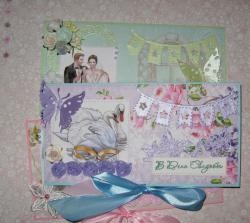
The most fashionable color of 2016 is considered to be lilac or lavender. It is not just beautiful, but also very gentle, it exudes warmth, summer and a good mood. Well, of course, if a color is fashionable this season, then every bride tries to see her wedding in this fashionable and delicate color. Everything down to the smallest detail, from wedding invitations to the design of the wedding banquet. You can just imagine for a moment how easy, gentle and romantic it will be. All invited guests already know in advance what colors the wedding will be in, this can be seen from the wedding invitations, so the guests respond to the newlyweds in return and give present also in lilac-lavender colors. At weddings, it is mainly customary to congratulate the newlyweds with money, so you can make a beautiful handmade money envelope in these colors. This informative article with a master class will serve as a good assistant for us in this, in which we will now look at making two envelopes for money.
Let's start and take for manufacturing:
• Two rectangles of watercolor paper 20*30 cm;
• Two sheets of paper for scrapbooking in purple colors, size 30*30 cm;
• Pictures of newlyweds;
• Paper cutting: lilac, mint and light lilac leaves, two large lilac hearts, two sets of glasses and a bottle of champagne, lilac flags;
• Stamped inscription “Happy Wedding Day”, as well as a pillow with ink of the same color;
• Fabric white flowers;
• Paper hydrangea flowers;
• Purple and white roses on a fabric ribbon;
• White ribbon with bobbles;
• Purple lace;
• Half pearl beads;
• White satin ribbon 20 mm wide and a lighter;
• Border hole punch, scissors, double-sided tape, glue stick, ruler, heat gun, pencil.


We place both watercolor rectangles horizontally and divide each into segments of 10.5 * 10.5 * 8.5 cm. We also leave 20 cm in height.


We draw bends and fold two bases for envelopes.


The inside sides are a little smaller to make it easier to invest.


Cut four pieces of white ribbon, two for each envelope. We glue a cut on the front and back of each envelope base.


Now we cut out two rectangles of 10*19.5 cm and one 8.5*19.5 cm from scrap paper. There are strips left at the bottom, which we punch holes in, we will glue them to the front parts.


We immediately glue the blanks on the inside and on the back.


We glue strips on the front ones at the top. We cut out inscriptions and pictures and tint them.


We glue and sew on pictures with inscriptions. Now we glue large hollow hearts so that the pictures are inside.


We also glue the front blanks to the bases and sew them. We sew the back and inner ones together, you get a sewn envelope.


We glue the flags inside, tie the envelopes with bows and now decorate both of them on top.


It turns out like this for us. And gentle, and stylish, and beautiful.Thank you for your attention!


Let's start and take for manufacturing:
• Two rectangles of watercolor paper 20*30 cm;
• Two sheets of paper for scrapbooking in purple colors, size 30*30 cm;
• Pictures of newlyweds;
• Paper cutting: lilac, mint and light lilac leaves, two large lilac hearts, two sets of glasses and a bottle of champagne, lilac flags;
• Stamped inscription “Happy Wedding Day”, as well as a pillow with ink of the same color;
• Fabric white flowers;
• Paper hydrangea flowers;
• Purple and white roses on a fabric ribbon;
• White ribbon with bobbles;
• Purple lace;
• Half pearl beads;
• White satin ribbon 20 mm wide and a lighter;
• Border hole punch, scissors, double-sided tape, glue stick, ruler, heat gun, pencil.


We place both watercolor rectangles horizontally and divide each into segments of 10.5 * 10.5 * 8.5 cm. We also leave 20 cm in height.


We draw bends and fold two bases for envelopes.


The inside sides are a little smaller to make it easier to invest.


Cut four pieces of white ribbon, two for each envelope. We glue a cut on the front and back of each envelope base.


Now we cut out two rectangles of 10*19.5 cm and one 8.5*19.5 cm from scrap paper. There are strips left at the bottom, which we punch holes in, we will glue them to the front parts.


We immediately glue the blanks on the inside and on the back.


We glue strips on the front ones at the top. We cut out inscriptions and pictures and tint them.


We glue and sew on pictures with inscriptions. Now we glue large hollow hearts so that the pictures are inside.


We also glue the front blanks to the bases and sew them. We sew the back and inner ones together, you get a sewn envelope.


We glue the flags inside, tie the envelopes with bows and now decorate both of them on top.


It turns out like this for us. And gentle, and stylish, and beautiful.Thank you for your attention!


Similar master classes
Particularly interesting
Comments (0)


